Tool
Poster splitter
Print a large poster on a normal home printer. Pick the target size and this page works out the tile grid and sheet count — then drop in an image or PDF and it generates the print-ready tiled PDF with cut marks and alignment guides, entirely in your browser. Nothing is uploaded.
Result
12 sheets
- Grid
- 4 × 3
- Tile orientation
- portrait
- Printable per tile
- 200 × 287 mm
- Coverage per inner tile
- 190 × 277 mm
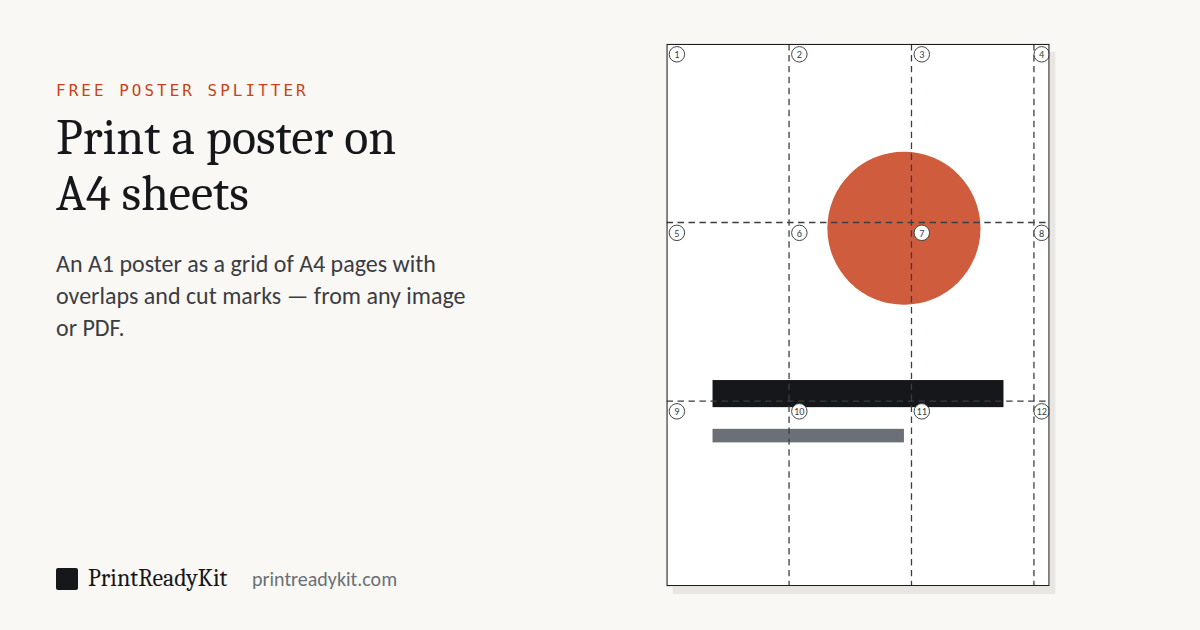
Tiling preview
Dashed lines are tile joints. Each joint hides a 10 mm overlap.
Generate the tiled PDF
Choose an image (PNG, JPG, WebP) or a PDF. It is processed on your device — the file never leaves your browser. Output: one PDF with 12 A4 pages, each at true scale with cut marks and alignment guides.
Assembly in four steps
1 · Print at 100 %
Print the generated PDF with scale at 100 % ("Actual size", never "Fit"). Print the first sheet on its own and measure the check line on it — 50 mm, or 2 in on Letter and Tabloid — in the strip the next sheet will cover. If it measures short, the page was scaled: fix the setting before printing the rest. From a phone, which often has no scale setting, every sheet shrinks by the same amount: the tiles still line up and the poster comes out a few percent smaller.
2 · Trim at the cut marks
On every tile except the left column, trim the left margin at the corner ticks. Same for the top margin on every row except the first.
3 · Align on the dashed guides
Lay each trimmed edge onto its neighbour so it sits on the printed dashed line — the artwork in the overlap strip lines up seamlessly.
4 · Tape from the back
Hold each joint with small tape tabs first, check alignment from the front, then run full-length tape along every joint on the back.
Frequently asked questions
Is my file uploaded anywhere?
No. The image or PDF is opened directly in your browser with the FileReader and canvas APIs; splitting and PDF generation happen on your device. Nothing is transmitted to a server — the site has no backend to send it to.
Acrobat Reader’s Poster option is greyed out. What can I do?
On a Mac, many people have reported this since macOS Sonoma (2023): free Reader shows Poster (and Advanced Print Setup) greyed out, and Adobe’s forum threads were still without a fix in 2025. Unticking "Print as image", the old advice, reportedly does not help there. Open the PDF here instead: choose the finished poster size and the sheet size, and the splitter builds a new PDF of tiles with overlaps and cut marks that any PDF reader prints at 100%. On Windows, Reader’s Poster option normally works — make sure "Print as image" under Advanced is not ticked.
How does poster tiling work?
The poster is divided into a grid of tiles, each printed on a normal sheet (A4 or US Letter, or A3 or Tabloid if your printer takes them) with a small overlap between neighbouring tiles. After printing, you trim the overlap off one edge of each inner tile, align the sheets using the printed guides and join them with tape from the back.
Why do I need an overlap?
Home printers cannot print to the paper edge and cutting is never perfectly straight. The overlap (10 mm by default) duplicates a strip of the artwork on both neighbouring tiles, so small trimming errors disappear inside the joint instead of leaving white gaps.
In what order should I assemble the sheets?
Build complete rows first, then join the rows to each other. An A0 poster on A4 comes to eighteen sheets at minimum and twenty-one at the default margin and overlap, and if you work outwards from the middle or join sheets as they come off the printer, every small misalignment adds to the next one — by the far corner it is visible. Working a row at a time keeps the error in one direction where you can still correct it. Lay the whole grid out unglued first, using the row and column label in each margin, and check it against the preview above before any tape comes out. Tape from the back, and let the sheet underneath be the one that keeps its overlap.
What do the marks on each generated page mean?
Short corner ticks show where to cut (the left edge of every column after the first, the top edge of every row after the first). The light dashed line shows where the edge of the next sheet should sit when you glue or tape the overlap. A small label in the margin identifies each tile's row and column.
What DPI should I choose?
150 DPI is the large-format standard and the right default: posters are viewed from a distance. Choose 300 DPI only for small posters (A3/A2) that will be inspected up close — file size roughly quadruples. 96 DPI is a quick draft for checking the layout.
My source is a PDF — does the output stay vector?
Yes, by default. Each sheet is cut from your original PDF page and clipped to its tile, so text, lines and shapes stay vector — sharp at any poster size, at exact scale, and the file stays small. That suits sewing patterns, plans and designs exported from Canva or Illustrator. A rotated PDF page (or one with a custom unit size), and an image such as a JPG or PNG, is tiled as a high-resolution image at the output DPI instead; at 150–300 DPI that is indistinguishable at poster viewing distance.
How do I print an A0 sewing pattern on A4 or Letter at full size?
Open the pattern PDF here and choose "Same size as the PDF page, 100%" as the poster size — the option appears once a PDF is loaded and shows the page’s size. Pick A4 or Letter sheets: the splitter tiles the page 1:1, nothing enlarged or shrunk, with overlaps, cut marks and a check line on the first sheet. Print at 100% ("Actual size"), then measure the pattern’s own test square before cutting fabric. If the designer also publishes a print-at-home A4 or Letter version, that one already has their own assembly marks.
How do I print a picture on 4 A4 sheets, or an A3 on two A4?
Choose "Custom size…" as the poster size and enter the largest picture the sheets can hold. A home printer leaves a 5 mm margin and every join needs a 10 mm overlap, so four A4 sheets in a 2 × 2 grid make a poster up to 390 × 564 mm (four Letter sheets 402 × 529 mm), not the full A2 that four sheets add up to. For the same reason two A4 sheets make 287 × 390 mm: an A3 picture fits on two only at about 92%, and at full size it takes 4 sheets. A tarpapel for a school project, the paper poster used in the Philippines, prints the same way on short bond (Letter) or A4.
Does the calculator account for scaling?
The generated PDF is always at true scale: each page is exactly the paper size you chose, so print it at 100% ("Actual size") with scaling off. If you use the grid numbers with your own PDF reader's poster mode instead, the same rule applies.
What is the best overlap value?
10 mm suits most home printers. If your printer has unusually wide unprintable margins (some are 5 mm or more per edge), raise the overlap to 15 mm so alignment stays easy.
Poster splitter, the Rasterbator or Block Posters?
All three print one picture across several sheets that you trim and tape together. They differ in what the picture turns into, what you can feed them, and where your file goes.
- The Rasterbator is known for turning the picture into large halftone dots, with calmer styles on offer too. It runs in your browser, takes JPEG, PNG, GIF and WebP images up to 40 MB, and produces a PDF with margins, overlap and crop marks.
- Block Posters works on a copy of your image uploaded to its server, which deletes uploads periodically.
- This splitter keeps the picture as it is and also takes a PDF, so a vector poster or a document page stays sharp at any size. Nothing is uploaded. It gives the printable area of each tile, the overlap between them and the order to assemble them in.
Want the dot effect? Use the Rasterbator. Want the poster to look like the original, or is it a PDF? Use this. PrintReadyKit is not connected with either site; the comparison reflects each site’s own description in September 2026.
Can Word, Canva or my PDF reader print a poster across pages?
- Adobe Acrobat and Acrobat Reader can on Windows: in the print dialog, under Page Sizing & Handling, choose Poster, which tiles a PDF with an overlap, cut marks and labels. On a Mac, many people have reported free Reader's Poster option greyed out — in Adobe's forum threads since macOS Sonoma in 2023, still without a fix from Adobe in 2025. Whether it affects your copy depends on your Reader and macOS versions; if it is greyed out for you, this splitter tiles the same PDF in the browser instead.
- Word and PowerPoint have no poster option of their own. Some printer drivers add one on Windows — Canon, Epson and Brother document a Poster setting in the printer's properties — but it splits the page into a fixed grid such as 2 × 2 or 3 × 3 sheets rather than to a size you choose, and only if your printer has it.
- Mac Preview and Canva cannot split one page across sheets. Preview offers Scale to Fit or Fill Entire Paper, and Canva hands the design to the normal print dialog.
This splitter works the other way round: choose the finished size in centimetres or inches, see how many sheets it takes, and get one PDF from a picture or a PDF — in any browser, including a phone's.
Last updated
Related
- Tabloid (11 × 17)Two Letter sheets tile it exactly
- 24 × 36 poster specsResolution and bleed at large format
- Print at actual sizeTiles only align at 100 %
- Calibration testCheck the tiles will line up before printing 12 pages
- Check the resolution firstWill the enlargement hold up?
- A3 paper sizeThe office-printer poster ceiling